DTI Analysis: Soup to Nuts Playlist


Instead of going through each DTI analysis step individually, I've collated everything into a Youtube playlist down below. Just remember that we are using data from the FSL practical course here, and also remember that suing somebody for giving out bad advice, although it is admittedly an easy way to become fantastically wealthy, won't necessarily make you happier.

In any case, just to briefly go over the rest of the steps: After correcting for magnetic field distortions and eddy currents, tensors are fitted using the dtifit command (or simply going through the FDT menu in the FSL interface). Once this has been done for each subject, a series of TBSS tools are used, each one prefixed by "tbss"; for example, tbss_1_preproc, tbss_2_reg, and so on. (You can find all of these in the $FSLDIR/bin directory, and if you have a good handle on Unix programming, you can inspect the code yourself.) After you have run all of those for your dataset, you set up the appropriate experimental design and contrasts, and use the randomise tool to perform statistics in your tractography mask.

Keep in mind that this is just beginner's material; and that if you were to compare your DTI competence to dating, if would be like you were still in that awkward teenager phase, unable to talk to anybody or make eye contact.

However, much of this material has already been covered in other blogs and online resources, provided by several other highly talented scientists and researchers, and - as much as I constantly fantasize about establishing a monopoly over neuroimaging information - there is no practical way to destroy them all.

Therefore, instead of posting redundant information, I highly recommend checking out an ongoing step-by-step series on TORTOISE by Peter Molfese, which you can compare to your results with FSL, and another blog dedicated to diffusion imaging, diffusion-imaging.com. The latter site covers virtually every piece of diffusion imaging software and pipeline out there, and is a good place to start.


DTI Analysis, Steps 1 & 2: Distortion Correction and Eddy Correction

DTI data comes into this world just as we do - raw, unprocessed, unthresholded, and disgusting. Today's parents are much too easy on their children; back in my day, boys and girls were expected to correct their own erratic motion artifacts, to strip their own skulls when too much cranium started sprouting around their cortex, and reach significance through their own diligence and hard work. "No dinner for you until you've gotten rid of those filthy distortion currents on your hands, young man!" was a common saying around my household.

Unfortunately, these days we live in a society increasingly avoiding taking responsibility for their own actions, filled with people more and more unwilling to strip their own skulls. (Even though that would save neuroimaging researchers countless hours of preprocessing.) This trend is the result of several complex cultural and sociological factors, by which I mean: Lawyers. Things have gotten so bad that you could, to take a random example, potentially sue someone posting advice on an unlicensed website if following those instructions somehow messed up your data.

This actually happened to a friend of mine who publishes the nutrition blog tailored for Caucasian males, White Man's Secret. After one of his readers formed kidney stones as a result of following advice to drink a two-liter of Mello Yello every day, the author was sued for - and I quote from the court petition - "Twelve Bazillion Dollars."

In any case, DTI data takes some time to clean up before you can do any statistics on it. However, the preprocessing steps are relatively few, and are analogous to what is done in a typical FMRI preprocessing pipeline. The steps are to identify and correct any distortions during the acquisition, and then to correct for eddy currents.

The first step, distortion correction, can be done with FSL's topup command. Note that this will require two diffusion weighted images, one with the encoding direction in anterior-to-posterior direction (AP) and one encoded in the posterior-to-anterior direction (PA). You will also need a textfile containing information about the encoding directions and the total readout time (roughly the amount of time between the first echo and the last echo); for example, let's say we have a text file, acqparams.txt, containing the following rows:

0 -1 0 0.0665
0 1 0 0.0665

Here a -1 means AP, and 1 means PA. The last column is the readout time. If you have any questions about this, ask your scanner technician. "What if he's kind of creepy?" I don't care, girl; you gotta find out somehow.

While you're at it, also ask which image from the scan was the AP scan, and which was the PA scan. Once you have identified each, you should combine the two using fslmerge:

fslmerge -t AP_PA_scan AP_scan PA_scan 

Once you have that, you have all you need for topup:

topup --imain=AP_PA_scan --datain=acqparams.txt --out=topup_AP_PA_scan

This will produce an image, topup_AP_PA_scan, of where the distortions are located in your DTI scan. This will then be called by the eddy tool to undo any distortions at the same time that it does eddy correction.

The only other preparation you need for the eddy correction is an index list of where the acquisition parameters hold (which should usually just be a 1 for each row for each scan), and a mask excluding any non-brain content, which you can do with bet:

bet dwi_image betted_dwi_image -m -f 0.2

Then feed this into the eddy command (note that a bvecs and bvals image should be automatically generated if you imported your data using a tool such as dcm2niigui):

eddy --imain=dwi_image --mask=betted_dwi_image --index=index.txt --acqp=acqparams.txt --bvecs=bvecs --bvals=bvals --fwhm=0 --topup=topup_AP_PA_scan --flm=quadratic --out=eddy_unwarped_images

Note that the --fwhm and --flm arguments I chose here are the defaults that FSL recommends.

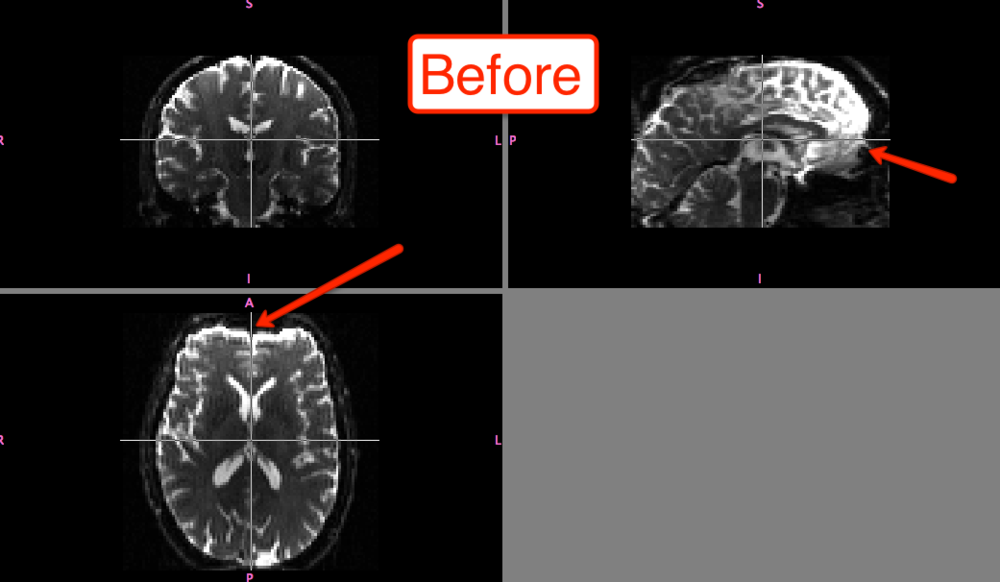
The differences before and after can be seen in fslview:


Of course, the distortion correction step isn't strictly necessary; and you can still do a much simpler version of eddy correction by simply selecting FDT Diffusion from the FSL menu and then selecting the Eddy Correction tab, which only requires input and output arguments. All I'm saying is that, if you're feeling particularly litigious, you should probably be safe and do both steps.


Blistering Fast Functional Connectivity Analysis with 3dTproject

Because speed is associated with freedom, happiness, and the American way - we want results, we want visible results, and we want them now, darn it! - it is no surprise that neuroimaging analysis is becoming exponentially faster and more efficient. Gone are the days when you could run a slice-timing step, go to bed, and wake up eight hours later when it finally finished. Most likely it crashed, meaning you had to run the entire thing all over again, but that didn't matter - the point was that you at least felt as though you were doing something during that time.

Regardless, we are approaching a radically different era now; and one of the harbingers of that era is AFNI's 3dTproject. Released a few months ago, this tool is now the default in both uber_subject.py and afni_proc.py when you do resting state analyses. It's quicker, more efficient, and allows fewer chances to mess things up, which is a good thing.

To include 3dTproject in your analysis pipeline, simply apply "rest" to the analysis initialization screen when running uber_subject.py, or copy example #9 from the help documentation of afni_proc.py. Under no circumstances should you try running 3dTproject manually, since you, possessing the hand-eye coordination of a cheese burrito, will inevitably make a typo and screw something up. Nevertheless, if you insist on doing it yourself, I recommend using the following code that is automatically generated by the .py scripts:

3dTproject -polort 0 -input pb04.$subj.r*.blur+tlrc.HEAD -censor motion_${subj}_censor.1D -cenmode ZERO -ort X.nocensor.xmat.1D -prefix errts.${subj}.tproject

Needless to say, you will have to have already run your preprocessing steps and have run 3dDeconvolve with the -x1D_stop option to generate the necessary matrices.


Introduction to Diffusion Tensor Imaging: From Hospital Horror Story to Neuroimaging

It is well known that one of the deepest human fears is to be a patient in a hospital late at night, all alone, while a psychotic nurse injects you with a paralyzing agent, opens up your skull with a bone saw, and begins peeling away layers of your cortex while you are still awake.*

As horrifying as this nightmare scenario may be, it also lends an important insight into an increasingly popular neuroimaging method, diffusion tensor imaging (DTI; pronounced "diddy"). To be more gruesomely specific, the psychotic nurse is able to peel away strips of your brain because it has preferred tear directions - just like string cheese. These strips follow the general direction of fascicles, or bundles of nerves, comprising grey and white matter pathways; and of these pathways, it is white matter that tends to exhibit a curious phenomenon called anisotropy.

Imagine, for example, that I release a gas - such as, let's say, deadly neurotoxin - into a spherical compartment, such as a balloon. The gas, through a process called Brownian motion (not to be confused with the Dr. Will Brown frequently mentioned here) will begin to diffuse randomly in all directions; in other words, as though it is unconstrained.

However, release the same gas into a cylindrical or tube-shaped compartment, such as one of those cardboard tubes you used to fight with when you were a kid,** and the gas particles will tend to move along the direction of the tube. This is what is known as anisotropy, meaning that the direction of the diffusion tends to go in a particular direction, as opposed to isotropy, where diffusion occurs in all directions with equal probability.


Left two figures: Ellipsoids showing different amounts of anisotropy, with lambda 1, 2, and 3 symbolizing eigenvalues. Eigenvalues represent the amount of diffusion along a particular direction. Right: A sphere representing isotropy, where diffusion occurs with equal probability in all directions.

This diffusion can be measured in DTI scans, which in turn can be used to indirectly measure white matter integrity and structural connectivity between different areas of the brain. A common use of DTI is to compare different populations, such as young and old, and to observe where fractional anisotropy (FA) differs between groups, possibly with the assumption that less FA can be indicative of less efficient communication between cortical regions. There are other applications as well, but this is the one we will focus on for the remainder of the tutorials.

The data that we will be using can be found on the FSL course website, after scrolling down to Data Files and downloading File 2 (melodic and diffusion). I haven't been able to find any good online repositories for DTI data, so we'll be working with a relatively small sample of three subjects in one group, and three subjects in the other. Also note that while we will focus on FSL, there are many other tools that process DTI data, including some new commands in AFNI, and also a program called TORTOISE. As with most things I post about, these methods have already been covered in detail by others; and in particular I recommend a blog called blog.cogneurostats.com, which covers both the AFNI and TORTOISE approaches to DTI, along with other tutorials that I thought I had been the first to cover, but which have actually already been discussed in detail. I encourage you to check it out - but also to come back, eventually.


*Or maybe that's just me.
**And maybe you still do!

Quick and Efficient ROI Analysis Using spm_get_data

For any young cognitive neuroscientist out for the main chance, ROI analyses are an indispensable part of the trade, along with having a cool, marketable name, such as Moon Unit or Dweezil Zappa. Therefore, you will find yourself doing a lot of such ROI analyses; and the quicker and more efficient you can do them, with a minimum of error, will allow you to succeed wildly and be able to embark upon an incredible, interesting career for the next four or five decades of your life before you die.

Most ROI analyses in SPM are carried out through the Marsbar toolbox, and for most researchers, that is all they will ever need. However, for those who feel more comfortable with the command line, there is a simple command within the SPM library - spm_get_data - that will make all of your ROI fantasies come true. All the command needs is an array of paths leading to the images you wish to extract data from, along with a matrix of coordinates representing the ROI.

First, the ROI coordinates can be gathered by loading up an arbitrary contrast and selecting an ROI created through, say, Marsbar or wfu_pickatlas. Next, set your corrected p-value threshold to 1; this will guarantee that every voxel in that ROI is "active," which will be recorded by a structure automatically generated each time the Results GUI is opened, a structure called xSPM. One of the fields, xSPM.XYZ, contains the coordinates for each voxel within that ROI. This can then be assigned to a variable, and the same procedure done for however many ROIs you have. The best part, however, is that you only need to do this once for each ROI; once you have assigned it to a variable, you can simply store it in a new .mat file with the "save" command (e.g., save('myROIs.mat', 'M1', 'ACC', 'V1')). These can then be restored to the Matlab workspace at any time by loading that .mat file.

Note: An alternative way to get these coordinates just from the command line would be the following:

Y = spm_read_vols(spm_vol(seedroi),1);
indx = find(Y>0);
[x,y,z] = ind2sub(size(Y),indx);

XYZ = [x y z]';

Where the variable "seedroi" can be looped over a cell containing the paths to each of your ROIs.


The next step is to create your array of images you wish to extract data from - which, conveniently, is stored within the SPM.mat file that is created any time you run a second-level analysis. For example, let's say that I carried out a couple of 2nd-level t-tests, one for left button presses, the other for right button presses. If I go into the folder for left button presses that has already estimated an run a second-level analysis, all of the contrast images that went into that analysis are now stored in SPM.xY.P, which is available in your workspace after simply navigating to the directory containing your SPM.mat file and typing "load SPM".

Lastly, spm_get_data is called to do the ROI analysis by extracting data from each voxel in the ROI for each subject for each contrast, and these are averaged across all of the voxels in that ROI using the "mean" function. Sticking with the current example, let's say have a left M1 region and a right M1 region, the coordinates of which have been extracted using the procedure detailed above, and which have been saved into variables called left_M1 and right_M1, respectively. I then navigate to the left button presses second-level directory, load SPM, and type the following command:

right_M1_leftButtonPress = mean(spm_get_data(SPM.xY.P, right_M1),2)

which returns an array of one value per subject for that contrast averaged across the ROI. You can then easily navigate to another second-level directory - say, right button presses - and, after loading the SPM.mat file, do the same thing:

right_M1_rightButtonPress = mean(spm_get_data(SPM.xY.P, right_M1),2)

T-tests can then be carried out between the sets of parameter or contrast estimates with the t_test function:

[h, p, ci, stats] = ttest(right_M1_leftButtonPress, right_M1_rightButtonPress)

which will return the p-value, confidence interval, and t-value that you would then report in your results.


Deep Thoughts

During my recent vacation I had the misfortune of witnessing two sublime musical events: One was seeing Natasha Paremski play Rachmaninoff's Third Piano Concerto (immediately dubbed "Rock's Turd" by quick-thinking music critics), and the other was attending a live performance of Mozart's Requiem in D Minor. Both were profound, noble, beautiful beyond compare; but hearing such masterworks also compelled me to evaluate my own life, an exercise I detest. Instead of being able to muse upon my own greatness and simply say to myself whatever words came into my mind - activities which I enjoy heartily - I was instead stunned into silence, and slowly, against my will, forced into the odious task of self-reflection. What have I done so far with my life, I thought, and what will I do with the usual biblical threescore and ten? Mozart and Mendelssohn were composing deathless music while still in their teens; Goethe began incubating the idea for Faust while only a boy; Liszt wrote the first version of his finger-breaking études when he was only fifteen years old. What was I doing around then? Obsessively working on my Starcraft win/loss ratio, and worrying whether my acne and alarming profusion of nasal hair were diagnostic of a thyroid disorder.

The way to happiness, as I am continually reminded, is to actively avoid any contact with anyone greater than you are; and if any acquaintance with a masterwork must be made, if only to be able to talk about it with an air of superficial sophistication, better to read a summary or criticism of it and find out what others have said about it, rather than experience the real thing. Or, if you dare, come into contact with it, but do not linger over it, or let it become part of your internal world, lest you realize how depressingly unfurnished and impoverished it really is. Read Madame Bovary quickly, for example, without pausing to observe how much craftsmanship and precision goes into every sentence, and how carefully weighed is each word; listen to the Jupiter Symphony only to become familiar with the musical themes, without thinking for a moment what kind of miracle this music is, and how no one will ever again write quintuple invertible counterpoint with such elegance and ease.

But should you ever chance to happen upon someone who makes you realize that this person thinks better than you, feels deeper than you, and has a vision of life rising above the paltry, the partial, and the self-defensive - horrors! - merely remind yourself that you would have been the same way, if only you had the advantages this person had while they were growing up, and only if you possessed the same temperament as they do - which, when you think about it, is really just a random occurrence. In this way you can begin to feel a bit better about having contributed so humiliatingly little; in this way, everyone can fancy themselves an embarrassed genius.


=========================

In any case, I've gotten a couple of comments and have made a couple of small changes to the SPM automated first-level script, such as catching whether certain files exist or not, and also dealing with runs that do not contain a particular regressor, which may be present in other runs. According to my imperial tests, it should be able to handle anything you throw at it. Maybe.

Escape to Los Angeles

Because you all need to know when and where I go on vacation, I will be traveling to Los Angeles, California, for the next week; followed by a trip to Minnesota. Those of you still in Bloomington: Please don't break into my apartment. But if you do, could you at least water my plants? I forgot about that when I left town this afternoon. Thanks!

However, just because I am on the other side of the country, hiking and swimming and laughing and playing the Schubert F Minor Fantasie and Grieg and Brahms cello sonatas, doesn't mean that I'll quit updating. Do you think I would ever quit that? Did we quit when the Germans bombed Pearl Harbor? Hell no. So remember to check back regularly, because I will continue to post on topics such as GLMs, MVPA, FIFY, and IMHO. Maybe. It really depends on how much fun I'm having.


Multiple Regression in SPM

A couple of videos have been posted about multiple regression in SPM, both at the first level and second level. Technically, almost all of the GLMs researchers usually set up use multiple linear regression, where a linear combination of weighted regressors is fit to the timecourse of each voxel. However, in SPM parlance, regressors are distinct from conditions: Conditions are typically convolved with some sort of basis function (usually a hemodynamic response function), whereas regressors are not convolved with anything. For example, someone may enter motion parameters as regressors, since they are not convolved with any hemodynamic shape, but still may account for some of the variance observed in the signal (and, we hope, the signal that is primarily due to motion). Another example would be entering in the timecourse extracted from an ROI to do a functional connectivity analysis, or inserting the interaction term from a PPI analysis as a regressor.

At the second level SPM also gives the option for doing multiple regression; but this is simply the entering of covariates which can be tested for correlations with the signal change in contrasts across subjects. In most cases, however, you can select any other design, and enter in covariates regardless of which design that you choose; which I believe to be the better option, since it is more flexible.

In any case, most of the rest of the details can be found in the following videos. Speak hands for me.


Updated SPM Command Line, Including Beta Series Option

I've updated the code of the previously discussed previous script in the previous post, previously, including the addition of more help text to explain certain options and termination of the script if the timing file is not found.

However, the biggest change is a block of code to convert the timings files so that each trial is now a regressor, before entering them into the GLM. With so many regressors, the GLM will look a little funky; possibly something like this:


Note that, since there are so many regressors and so many scans, not all of them are going to be labeled individually; but it should look as though there is only one estimation per column, or blip of white underneath each regressor. Also due to space constraints the parameter estimability may not be completely visible, but when each trial is being estimated individually, you should still get a beta for each trial. Check the output directory to make sure that you have the number of betas you think you should have: one for each trial, plus the amount of session constants (usually equal to the number of runs for the subject).

The updated script can be found here; as always, send me any comments if you encounter any serious issues or bugs. I recommend using it as a replacement for the previously discussed previous script, since it can either estimate each trial individually or average them together, depending on whether you set the DO_BETASERIES flag to 1 or 0.

All of this is explained clearly in the following video:


Running SPM First-Level Analyses from the Command Line

For most people, doing first-level analyses in SPM is tedious in the extreme; for other people, these analyses are manageable through command line scripting in Matlab. And there are still other people who don't even think about first-level analyses or SPM or Matlab or any of that. This last class of people are your college classmates who majored in something else, like economics, and are living significantly less stressful lives than you, making scads of money, and regularly eating out at restaurants where they serve shrimp the size of Mike Tyson's forearm.

Assuming that you belong to the first category, however, first-level analyses are invariably a crashing bore; and, worse, completely impractical for something like beta-series analysis, where a separate regressor is needed for individual events.

The following script will do all of that for you, although it makes many assumptions about your timing files and where everything is stored. First, your directory needs to be set up with a root directory containing all of the subjects, as well as a separate timing directory containing your onsets files; and second, that the timing files are written in a four-column format of runs, regressors, onsets (in seconds), and duration. Once you have all of that, though, all it takes is simply modifications of the script to run your analysis.

As always, let me know if this actually helps, or whether there are sections of code that can be cleaned up. I will be making a modification tomorrow allowing for beta series analysis by converting all of the timing events into individual regressors, which should help things out.

Link to script: http://mypage.iu.edu/~ajahn/docs/Run_SPM_FirstLevel.m

% INPUT:
%  rootDir        - Path to where subjects are located
%  subjects       - Vector containing list of subjects (can concatenate with brackets)
%  spmDir         - Path to folder where you want to move the multiple conditions .mat files and where to the output SPM file (directory is created if it doesn't
%  exist)
%  timingDir      - Path to timing directory, relative to rootDir
%  timingSuffix   - Suffix appended to timing files
%  matPrefix      - Will be prefixed to output .mat files.
%  dataDir        - Directory storing functional runs.
%
% OUTPUT:
%  One multiple condition .mat file per run. Also specifies the GLM and runs
%  beta estimation.
%       
%
%       Note that this script assumes that your timing files are organized
%       with columns in the following order: Run, ConditionName, Onset (in
%       seconds), Duration (in seconds)
%
%       Ideally, this timing file should be written out from your
%       presentation software, e.g., E-Prime
%
%       Also note how the directory tree is structured in the following example. You may have to
%       change this script to reflect your directory structure.
%       
%       Assume that:
%         rootdir = '/server/studyDirectory/'
%         spmDir = '/modelOutput/'
%         timingDir = '/timings/onsets/'
%         subjects = [101]
%         timingSuffix = '_timing.txt'
%       1) Sample path to SPM directory:
%       '/server/studyDirectory/101/modelOutput/'
%       2) Sample path to timing file in the timing directory:
%       '/server/studyDirectory/timings/onsets/101_timing.txt'
%
% Andrew Jahn, Indiana University, June 2014
% andysbrainblog.blogspot.com

clear all

%%%----Things you will want to change for your study----%%%

rootDir = '/data/hammer/space5/ImagineMove/fmri/';
subjects = [214 215];
spmDir = '/RESULTS/testMultis/';
timingDir = 'fMRI_behav/matlab_input/';
timingSuffix = '_spm_mixed.txt';
matPrefix = 'testMulti';
dataDir = '/RESULTS/data/';

%Change these parameters to reflect study-specific information about number
%of scans and discarded acquisitions (disacqs) per run
funcs = {'swuadf0006.nii', 'swuadf0007.nii', 'swuadf0008.nii'}; %You can add more functional runs; just remember to separate them with a comma
numScans = [240 240 240]; %This if the number of scans that you acquire per run
disacqs = 2; %This is the number of scans you later discard during preprocessing
numScans = numScans-disacqs;
TR = 2; %Repetition time, in seconds

%Estimating the GLM can take some time, particularly if you have a lot of betas. If you just want to specify your
%design matrix so that you can assess it for singularities, turn this to 0.
%If you wish to do it later, estimating the GLM through the GUI is very
%quick.
ESTIMATE_GLM = 1;


%%%-----------------------------------------------------%%%


%For each subject, create timing files and jobs structure
for subject = subjects
    
    %See whether output directory exists; if it doesn't, create it
    outputDir = [rootDir num2str(subject) spmDir];
    
    if ~exist(outputDir)
        mkdir(outputDir)
    end
     
    %---Navigate to timing directory and create .mat files for each run---%
    cd([rootDir timingDir]);
    
    fid = fopen([num2str(subject) timingSuffix], 'rt');
    T = textscan(fid, '%f %s %f %f', 'HeaderLines', 1); %Columns should be 1)Run, 2)Regressor Name, 3) Onset Time (in seconds, relative to start of each run), and 4)Duration, in seconds
    fclose(fid);
    
    clear runs nameList names onsets durations sizeOnsets %Remove these variables if left over from previous analysis
    
    runs = unique(T{1});

    %Begin creating jobs structure
    jobs{1}.stats{1}.fmri_spec.dir = cellstr(outputDir);
    jobs{1}.stats{1}.fmri_spec.timing.units = 'secs';
    jobs{1}.stats{1}.fmri_spec.timing.RT = TR;
    jobs{1}.stats{1}.fmri_spec.timing.fmri_t = 16;
    jobs{1}.stats{1}.fmri_spec.timing.fmri_t0 = 1;

    %Create multiple conditions .mat file for each run
    for runIdx = 1:size(runs, 1)
            nameList = unique(T{2});
            names = nameList';
            onsets = cell(1, size(nameList,1));
            durations = cell(1, size(nameList,1));
            sizeOnsets = size(T{3}, 1);
        for nameIdx = 1:size(nameList,1)
            for idx = 1:sizeOnsets
                if isequal(T{2}{idx}, nameList{nameIdx}) && T{1}(idx) == runIdx
                    onsets{nameIdx} = double([onsets{nameIdx} T{3}(idx)]);
                    durations{nameIdx} = double([durations{nameIdx} T{4}(idx)]);
                end
            end
            onsets{nameIdx} = (onsets{nameIdx} - (TR*disacqs)); %Adjust timing for discarded acquisitions
        end

        save ([matPrefix '_' num2str(subject) '_' num2str(runIdx)], 'names', 'onsets', 'durations')
        
        %Grab frames for each run using spm_select, and fill in session
        %information within jobs structure
        files = spm_select('ExtFPList', [rootDir num2str(subject) dataDir], ['^' funcs{runIdx}], 1:numScans);

        jobs{1}.stats{1}.fmri_spec.sess(runIdx).scans = cellstr(files);
        jobs{1}.stats{1}.fmri_spec.sess(runIdx).cond = struct('name', {}, 'onset', {}, 'duration', {}, 'tmod', {}, 'pmod', {});
        jobs{1}.stats{1}.fmri_spec.sess(runIdx).multi = cellstr([outputDir matPrefix '_' num2str(subject) '_' num2str(runIdx) '.mat']);
        jobs{1}.stats{1}.fmri_spec.sess(runIdx).regress = struct('name', {}, 'val', {});
        jobs{1}.stats{1}.fmri_spec.sess(runIdx).multi_reg = {''};
        jobs{1}.stats{1}.fmri_spec.sess(runIdx).hpf = 128;
        
                
    end
    
    movefile([matPrefix '_' num2str(subject) '_*.mat'], outputDir)
    
    %Fill in the rest of the jobs fields
    jobs{1}.stats{1}.fmri_spec.fact = struct('name', {}, 'levels', {});
    jobs{1}.stats{1}.fmri_spec.bases.hrf = struct('derivs', [0 0]);
    jobs{1}.stats{1}.fmri_spec.volt = 1;
    jobs{1}.stats{1}.fmri_spec.global = 'None';
    jobs{1}.stats{1}.fmri_spec.mask = {''};
    jobs{1}.stats{1}.fmri_spec.cvi = 'AR(1)';
    
    %Navigate to output directory, specify and estimate GLM
    cd(outputDir);
    spm_jobman('run', jobs)
    
    if ESTIMATE_GLM == 1
        load SPM;
        spm_spm(SPM);
    end
    
end

%Uncomment the following line if you want to debug
%keyboard